
OpenAI API, How to Create a Personalized Chatbot?
In today’s rapidly evolving digital landscape, chatbots have emerged as game-changers. They are not just lines of code; they are powerful tools that can transform the way businesses interact with their customers, streamline processes, and provide instant assistance. From customer support to e-commerce and beyond, chatbots have found applications across various industries.
One of the most exciting developments in the world of chatbots is the ability to create personalized, human-like interactions. Imagine having a virtual assistant that not only understands your queries but also responds in a way that feels tailor-made for you. This level of personalization not only enhances user engagement but also boosts customer satisfaction.
This is where the OpenAI API comes into play. OpenAI has been at the forefront of natural language processing (NLP) research, and their API allows developers to harness the power of cutting-edge language models like GPT-3 and GPT-4. With this API, you can create chatbots that are not only intelligent but also capable of adapting to individual users’ needs and preferences.
In this blog, we’ll delve into the world of personalized chatbots, exploring the basics of the OpenAI API and demonstrating how you can leverage it to create chatbots that deliver truly personalized experiences.
OpenAI API Initialization
Step 1: Sign Up for OpenAI API
Before you can start building your chatbot, you need access to the OpenAI API. To get started, sign up for an OpenAI account. If you already have one, you’re a step ahead!
Type your prompt in the top bar and hit send. After a few seconds, you’ll see the results below.
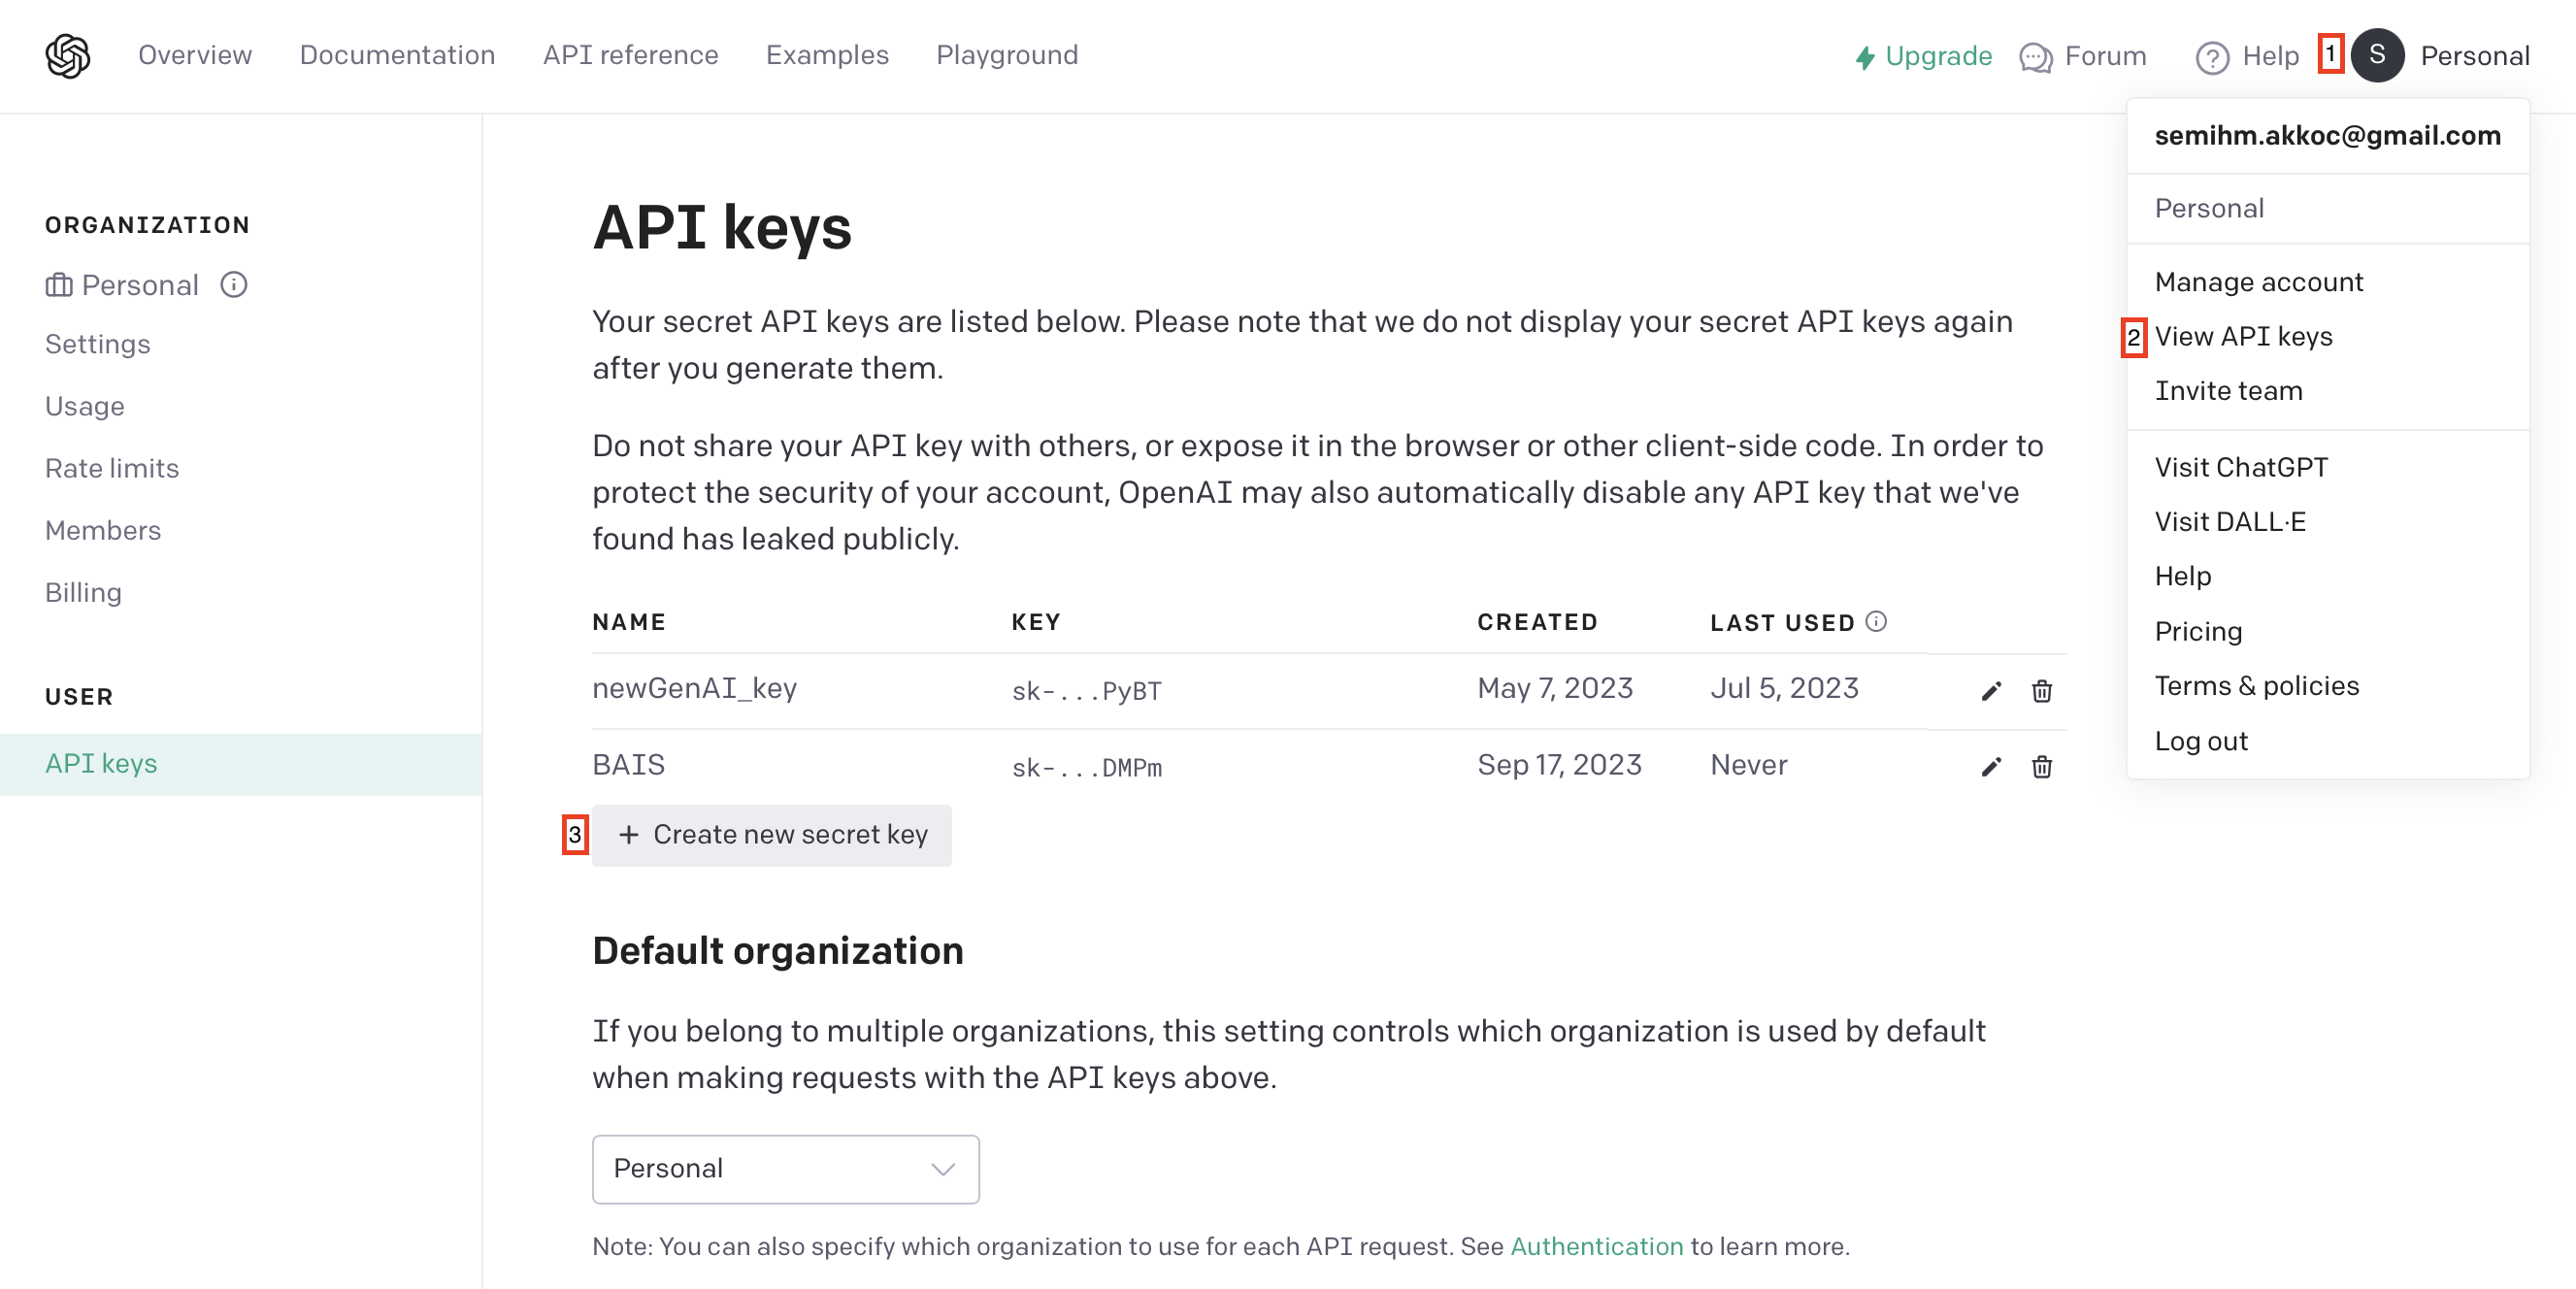
Step 2: Obtain Your API Key
Once you’re logged in, navigate to your account settings. Here, you’ll find your API key. This key is your golden ticket to interact with the OpenAI API, so keep it secure.
Step 3: Install Required Libraries
OpenAI API offers various languages to utilize it but in this guide we will use Python to interact with the API so make sure you have Python installed and consider using a library like “openai” for easier API integration. To install the “openai” library pip tool can be used.
pip3 install openai

Once the library is installed and these initial steps completed, you’re now equipped to embark on your journey to create a personalized chatbot using the OpenAI API. Let’s dive into the basics of how the API functions.
Basics of the OpenAI API
Endpoints: In the world of APIs, an endpoint is a specific URL that you use to make requests and interact with the service. OpenAI API has endpoints for various language tasks, but for chatbots, the /v1/engines/davinci-codex/completions endpoint is often used.
Requests: A request is what you send to the API when you want it to perform a specific task. It typically includes information like the model you want to use, the prompt or message you want to provide, and any other parameters necessary for the task.
Responses: After you send a request, the API processes it and sends back a response. This response contains the information you requested or the result of the task. In the case of chatbots, the response will include the generated text based on your input.
Now, let’s look at some code examples to illustrate how to use the OpenAI API in Python:
import openai

# Your API key from Step 2 (it is better idea to use .env)
api_key = "YOUR_API_KEY"

# Initialize the OpenAI API client
openai.api_key = api_key

# Define your prompt or message
prompt = "Translate the following English text to French: 'Hello, how are you?'"

# Make a request to the API
response = openai.Completion.create(
    engine="davinci-codex",
    prompt=prompt,
    max_tokens=50,  # You can limit the response length
    n = 1, # number of completions
    stop = "", # stop generating when this text is encountered
)

# Get and print the generated text from the response
generated_text = response.choices[0].['text']
print(generated_text)
In this example, we initialize the OpenAI API client, create a request by specifying the engine, prompt, and any other parameters needed. We then send the request and extract the generated text from the response.
Now we will focus on how to utilize the GPT models. Chat models take a list of messages as input and return a model-generated message as output. Although the chat format is designed to make multi-turn conversations easy, it’s just as useful for single-turn tasks without any conversation.
An example Chat completions API call looks like the following:
response = openai.ChatCompletion.create(
    model="gpt-3.5-turbo",
    messages=[
        {"role": "system", "content": "You are a helpful assistant."},
        {"role": "user", "content": "Who won the world series in 2020?"},
        {"role": "assistant", "content": "The Los Angeles Dodgers won the World Series in 2020."},
        {"role": "user", "content": "Where was it played?"}
    ]
)
The main input is the messages parameter. Messages must be an array of message objects, where each object has a role (either “system”, “user”, or “assistant”) and content. Conversations can be as short as one message or many back and forth turns. Second parameter is the model. To get response from the most capable model 'gpt-4' and for more cost effective model 'gpt-3.5-turbo' can be used.
Typically, a conversation is formatted with a system message first, followed by alternating user and assistant messages.
The system message helps set the behavior of the assistant. For example, you can modify the personality of the assistant or provide specific instructions about how it should behave throughout the conversation. However note that the system message is optional and the model’s behavior without a system message is likely to be similar to using a generic message such as “You are a helpful assistant.”
The response that Chat completions API returns looks as follows:
{
  "choices": [
    {
      "finish_reason": "stop",
      "index": 0,
      "message": {
        "content": "The 2020 World Series was played in Texas at Globe Life Field in Arlington.",
        "role": "assistant"
      }
    }
  ],
  "created": 1677664795,
  "id": "chatcmpl-7QyqpwdfhqwajicIEznoc6Q47XAyW",
  "model": "gpt-3.5-turbo-0613",
  "object": "chat.completion",
  "usage": {
    "completion_tokens": 17,
    "prompt_tokens": 57,
    "total_tokens": 74
  }
}
The assistant’s reply can be extracted with:
response['choices'][0]['message']['content']
Creating a Chatbot Using Gradio
Step 1: Set Up Your Environment
Ensure you have the necessary libraries installed, including openai and gradio. You should have your OpenAI API key ready.
pip install openai gradio
Step 2: Initialize the OpenAI API Set up your OpenAI API key as shown in the previous sections.
import openai

openai.api_key = "YOUR_API_KEY"
Step 3: Define the Chatbot Function Create a function that takes user input and sends it to the OpenAI API for a response.
import openai

message_history = [{"role": "user", "content": f"You are the Bilkent AI Society AI Bot. Respond only with AI-related information to further input."},
                   {"role": "assistant", "content": f"OK"}]


def api_call(input):
    # tokenize the new input sentence
    message_history.append({"role": "user", "content": f"{input}"})

    completion = openai.ChatCompletion.create(
      model="gpt-3.5-turbo", #10x cheaper than davinci, and better. $0.002 per 1k tokens
      messages=message_history
    )
    #Just the reply:
    reply_content = completion.choices[0].message.content

    print(reply_content)
    message_history.append({"role": "assistant", "content": f"{reply_content}"})

    # get pairs of msg["content"] from message history, skipping the pre-prompt:              here.
    response = [(message_history[i]["content"], message_history[i+1]["content"]) for i in range(2, len(message_history)-1, 2)]  # convert to tuples of list
    return response
Step 4: Create a Gradio Interface Use Gradio to build a user-friendly interface for your chatbot. You can specify input types, define a function to call (your chatbot function), and customize the interface.
import gradio as gr

# creates a new Blocks app and assigns it to the variable demo.
with gr.Blocks() as demo:

    # creates a new Chatbot instance and assigns it to the variable chatbot.
    chatbot = gr.Chatbot()

    # creates a new Row component, which is a container for other components.
    with gr.Row():
        txt = gr.Textbox(show_label=False, placeholder="Enter text and press enter").style(container=False)
    txt.submit(api_call, txt, chatbot)
    txt.submit(None, None, txt, _js="() => {''}")

demo.launch()
Step 5: Run Your Chatbot When you run your Python script, Gradio will create a web-based interface where users can input messages, and your chatbot will respond accordingly. This provides an interactive and user-friendly way to chat with your AI-powered assistant.
Final Code
import openai
import gradio as gr

openai.api_key = "YOUR_API_KEY"

message_history = [{"role": "user", "content": f"You are the Bilkent AI Society AI Bot. Respond only with AI-related information to further input."},
                   {"role": "assistant", "content": f"OK"}]


def api_call(input):
    # tokenize the new input sentence
    message_history.append({"role": "user", "content": f"{input}"})

    completion = openai.ChatCompletion.create(
      model="gpt-3.5-turbo", #10x cheaper than davinci, and better. $0.002 per 1k tokens
      messages=message_history
    )
    #Just the reply:
    reply_content = completion.choices[0].message.content

    print(reply_content)
    message_history.append({"role": "assistant", "content": f"{reply_content}"})

    # get pairs of msg["content"] from message history, skipping the pre-prompt:              here.
    response = [(message_history[i]["content"], message_history[i+1]["content"]) for i in range(2, len(message_history)-1, 2)]  # convert to tuples of list
    return response


# creates a new Blocks app and assigns it to the variable demo.
with gr.Blocks() as demo:

    # creates a new Chatbot instance and assigns it to the variable chatbot.
    chatbot = gr.Chatbot()

    # creates a new Row component, which is a container for other components.
    with gr.Row():
        txt = gr.Textbox(show_label=False, placeholder="Enter text and press enter").style(container=False)
    txt.submit(api_call, txt, chatbot)
    txt.submit(None, None, txt, _js="() => {''}")
demo.launch()
By following these steps, you can quickly create an interactive chatbot using the OpenAI API and Gradio, making it easy for users to interact with your AI model and obtain responses in real-time.
Congratulations, you’ve created your personalized chatbot! 🥳
Helpful Resources
https://platform.openai.com/docs/api-reference/introduction
https://platform.openai.com/docs/guides/gpt
https://platform.openai.com/docs/api-reference/chat
https://www.gradio.app/guides/creating-a-chatbot-fast
https://medium.com/coinmonks/build-your-custom-chatbot-using-chatgpt-1393e4d5a300

